Sunday, October 23, 2011

Best Day Of My College Life

The best day of my college life is 21st October,2011 i.e. the last day of our college tech fest Nexus,2011. The whole day, I was indulged in participating in the events. There was no lecture on that day.

First Event Of Day
First event starts at 9 am. That was Adventurous Chronicles. We( team of 5 ) was assigned ten tasks which was to be completed in 30 minutes minutes.
Tasks were:
  1.  Collect a comb or a gloss
  2. Pic with black dog
  3. A workshop job
  4. Video of 5 min serving at Lipton
  5. Ten 5 rs. note
  6. Pic of HOD Name plates of departments
  7. Pic of College LOGO
  8. Pic of 10 mobile phones altogether
Two were more tasks.
We tried to do all the tasks fastly. More funny thing was to take pic with black dog. It was just runing and we were running behind the dog. hahaha. Anyhow we done all the tasks and went to submit the task. surprise was that , we were last of all the teams.. Again a funny event. Then we take rest and get ready for another event.
Second Event of the day
Second event was Picto Precept. I make my registration in it. But list was misplace and all teams were complete. So I just attended the event as an audience. Much fun was there in it too. One partner had to draw a logo using MS paint and another partner has to guess the Logo.

Third Event of the Day
Third event was Softronics , conducted by LUG. In it, there were three rounds:
  1. Ammend the code
  2. Write the code
  3. Quiz on Logo and language Perception.

Team of two was in it. Me and Rimal join it. It was much fun with the code. We won 200 cash prize(First Prize) along with certificate.In third round, we have to choose the question by our own choice number. So it was totally based on luck as to which question comes to you either easy or difficult. And there was one team who got all difficult questions and we all said- "Ise Kehte Hain Kismat Kharab, Hahaha". Thus It was much much enjoyable. At the end of event, the pics of winner were taken along with the organisers.

Fourth Event Of  The Day
After so much tiring, we had lunch and then we attended a workshop on Android. It was also very good.
As a whole, I enjoyed that day in college to the fullest.
May such day comes again in my life................. :-)




Sunday, October 9, 2011

Description of functions used in Slot Machine

Sound Generation in Turbo C ++

If you are creating graphical programs in turbo c++ then adding sound to the the program makes it more compelling experience for the viewer in another sense.Adding sound in the C++ program is very easy.In this guide you will learn to use sound for your programs.
Sound generation function:
The steps that involve to generate the sound in C++ are:
(1) Turning the sound on.
(2) Delay-ing for an appropriate amount of time.
(3) Turn-off the sound.
To perform these steps three standard functions are used :
sound( );
delay( );
nosound( );
Sound( ); function :-
The sound( ); function is used to set the sound generator to a specific frequency.You can specify the frequency from 15 to about 3000.
e.g. sound(100);
After execution of this function sound is turned on.So please note that sound remains on till it is specifically stopped.
delay( ); function :-
To delay the sound for perticular amount of time this function is used.
e.g.  delay(1000);
This function accepts single argument,and the time specified here is in the miliseconds.You can use the value 1000 for one second.
nosound( );:-
To turn off the sound started by the sound( ); function this function is used. This immediately turns off the sound generator.
Example:
 #include"dos.h" 
int main(void) { 
 sound(800); 
delay(1500); 
nosound(); 
 }  
Code explaination:
#include "dos.h"
To use the sound generating function we have to specify the “dos.h” file.

int main(void)

If you use the void main instead of this line then sound generating function may not able to return a value.
sound(800); delay(1500); nosound( );

Here the sound with frequency 800 hz is delayed for one and half seconds then nosound(); is used to turn off the sound generator.
These mentioned sound generating functions can be used to suspend the excution of program for perticular time period. You can use another function called sleep( ); to suspend the execution of the program for some time.
sleep( );
This function is used to suspend the program for perticular interval.
e.g. sleep(n);
Here value n is used to specify the time interval in seconds.

Functions included in Graphic.h Header file
In c++ we can use graphics. There is a pre defined header file that include the functions which help in drawing different shapes.

The header file is: graphics.h

These graphics are BGI graphics. They may not run on present version laptops in normal mode. They may work in safe mode and safe mode with command prompt.

Here are a few functions that are present under graphics.h

1.
initgraph()

syntax: initgraph(&gdriver,&gmode,PATH);
ex: initgraph(&gdriver,&gmode,"c:\\tc\\bgi");

This initgraph() initializes BGI graphics to be used in the program. It used the PATH as argument to search for the location where the BGI graphics are avialable.

If this PATH is simply specified as " ", then it understands as Auto Detect and searches for the BGI graphics. It may not work in some computers.


2.
line()
This is used to draw a line
syntax: line(x1,y1,x2,y2);
(x1,y1) and (x2,y2) are the two end points of the line


3.circle()
This is used to draw a circle
syntax:  circle(x,y,r)
Here x,y are the coordinates of the centre of the circle and is the radius

4.
rectangle()
This is used to draw a circle
syntax:  rectangle(x1,y1,x2,y2)
here (x1,y1) and (x2,y2) are the coordinates of diagonally opposite vertices of the rectangle.

5.drawpoly()
This is used to draw a polygon of n no. of sides. (given n)
syntax:  drawpoly(number_of_points,*points);
Here *points may be an array consisting of all the coordinates of the polygon.


6.fillpoly()
void far fillpoly (int numpoints, int far *polypoints);
 
Remarks: fillpoly draws the outline of a polygon using the current
line style and color, then fills the polygon using the current fill
pattern and fill color.
numpoints   - Specifies number of points
*polypoints - Points to a sequence of ("numpoints" x 2) integers.
 Each pair of integers gives the x and y coordinates
  of a point on the polygon.
 
7. floodfill()
void far floodfill (int x, int y, int border);
 
Remarks: floodfill flood-fills a bounded region. The area bounded 
by the color "border" is flooded  with the current fill pattern 
and fill color.  
(x,y) is the "seed point". If the seed is inside an enclosed area,
the interior will be filled.
If the seed is outside the enclosed area, the exterior will be filled.
8.Setfillstyle()  
setfillstyle()          Set the Fill Pattern and Fill Color
#include   <graphics.h>  
void far   setfillstyle(pattern,color);
int        pattern;
int        color;
setfillstyle() sets the current fill pattern and fill color used by bar(),
bar3d(), fillpoly(), floodfill() and pieslice().  There
are 11 predefined fill patterns. In addition you can fill a shape in with
the background color or a user-defined pattern. The names for the predefined
patterns are found in 'fill_patterns' in <graphics.h>:
 
     Name           Value     Description
     EMPTY_FILL       0       Fill with background color
     SOLID_FILL       1       Solid fill
     LINE_FILL        2       Fill with horizontal lines
     LTSLASH_FILL     3       Fill with ///, regular lines
     SLASH_FILL       4       Fill with ///, thick lines
     BKSLASH_FILL     5       Fill with \\\, thick lines
     LTBKSLASH_FILL   6       Fill with \\\, regular lines
     HATCH_FILL       7       Fill with hatch fill
     XHATCH_FILL      8       Fill with heavy hatch fill
     INTERLEAVE_FILL  9       Interleaving line fill
     WIDE_DOT_FILL   10       Widely spaced dot fill
     CLOSE_DOT_FILL  11       Closely spaced dot fill
     USER_FILL       12       User-defined fill pattern
 
    All patterns except EMPTY_FILL use the current fill color.
 
 Returns: Nothing. If coded, graphresult() returns -11 (graphics
        error) if invalid input was passed. The current fill
        pattern and fill color remain the same.
 
Note:To set a user-designed pattern, use setfillpattern(). Do
     not use setfillstyle() with a 'upattern' of USER_FILL.
 
 9.setcolor

 
  void far setcolor (int color);
 
 Remarks: setcolor sets the current drawing color to "color".
 The drawing color is the value that pixels are set to when the program draws lines, etc.

Note:- All the definations are noted from Net....


Program:-
#include<iostream.h>
#include<conio.h>
#include<time.h>
#include<dos.h>
#include<stdio.h>
#include<stdlib.h>
#include<graphics.h>
void village();
void trees();
void mountains();
void sun();
void moon();
void design();
int day,x,y;
void main()
{
day=0;
int gdriver=DETECT,gmode;
initgraph(&gdriver,&gmode,"c:\\tc\\bgi");
design();
for(int i=0;i<5;i++)
{
cleardevice();
design();
switch(i)
{
case 0: outtextxy(getmaxx()-100,50,"4 MARCH");break;
case 1: outtextxy(getmaxx()-100,50,"5 MARCH");break;
case 2: outtextxy(getmaxx()-100,50,"5 MARCH");break;
case 3:
case 4: outtextxy(getmaxx()-100,50,"6 MARCH");
outtextxy(50,50,"HAPI BDAY");break;
}
sleep(3);
}
getch();
}
void design()
{
village();
trees();
mountains();
if(day==1)
{
sun();
day=0;
}
else
{
moon();
day=1;
}
}

void village()
{
int tr[6]={100,350,200,350,150,300},tr1[6]={75,350,125,300,175,350};
setcolor(WHITE);
rectangle(10,10,getmaxx()-10,getmaxy()-10);
if(day==1)
setfillstyle(2,1);
else
setfillstyle(2,BLUE);
fillpoly(4,tr1);
if(day==1)
setfillstyle(2,6);
else
setfillstyle(2,BLUE);
fillpoly(3,tr);
int sq[]={115,350,115,400,145,400,145,380,155,380,155,400,185,400,185,350,115,350};
int sq1[]={90,350,90,400,120,400,120,380,130,380,130,400,160,400,160,350,90,350};
if(day==1)
setfillstyle(0,3);
else
setfillstyle(0,BLUE);
fillpoly(8,sq1);
line(220,330,220,400);
if(day==0)
setfillstyle(9,WHITE);
else
setfillstyle(9,0);
sector(220,320,0,360,10,20);
if(day==1)
setfillstyle(9,3);
else
setfillstyle(9,BLUE);
fillpoly(8,sq);
}
void trees()
{
if(day==1)
{
setcolor(BROWN);
setfillstyle(1,BROWN);
}
else
{
setcolor(BLUE);
setfillstyle(1,BLUE);
}
int tree[]={50,330,50,400,60,400,60,330};
fillpoly(4,tree);
if(day==1)
{
setcolor(GREEN);
setfillstyle(9,GREEN);
}
else
{
setcolor(BLUE);
setfillstyle(9,BLUE);
}
sector(55,330,0,360,20,30);
}

void mountains()
{
if(day==1)
{
setcolor(BROWN);
setfillstyle(1,BROWN);
}
else
{
setcolor(BLUE);
setfillstyle(1,BLUE);
}
int mou[]={250,300,300,250,350,300,400,250,450,300,500,250,550,300};
fillpoly(7,mou);
}

void sun()
{
setcolor(4);
setfillstyle(1,4);
sector(200,200,0,360,30,30);
}

void moon()
{
setcolor(WHITE);
setfillstyle(1,WHITE);
sector(200,200,0,360,30,30);
setfillstyle(1,0);
setcolor(0);
sector(180,180,0,360,30,30);
}

Saturday, October 8, 2011

Demo of Slot Machine

Program Of Making Slot Machine Graphics:-

#include<graphics.h>
#include<stdlib.h>
 #include<time.h>
 #include<conio.h>
 #include<dos.h>
 const int W=15;
 const int MAR=10;
 class shape
 {
 protected:
 int xCo,yCo;
 int linecolor;
 int fillcolor;
 public:
 shape()
 {
 xCo=0;
 yCo=0;
 linecolor=WHITE;
 fillcolor=WHITE;
 }
 void set(int x,int y,int lc,int fc)
 {
 xCo=x;
 yCo=y;
 linecolor=lc;
 fillcolor=fc;
 }
 void draw()
 {
 setcolor(linecolor);
 setfillstyle(SOLID_FILL,fillcolor);
 }
 };
 class ball :virtual public shape
 {
 public:
 ball():shape()
 {}
 void set(int x,int y,int lc,int fc)
 {
 shape::set(x,y,lc,fc);}
 void draw()
 {
 shape::draw();
 circle(xCo,yCo,W);
 floodfill(xCo,yCo,linecolor);
 }
 };
 class rect:virtual public shape
 {
 public:
 rect():shape()
 {}
 void set(int x,int y,int lc,int fc)
 {
 shape::set(x,y,lc,fc);
 }
 void draw()
 {
 shape::draw();
 rectangle(xCo-W,yCo-W,xCo+W,yCo+W);
 floodfill(xCo,yCo,linecolor);
 moveto(xCo-W,yCo+W);
 lineto(xCo+W,yCo-W);
 }
 };
 class tria:virtual public shape
 {// int triarray[];
 public:
 tria()
 {
 shape();
  /*triarray[0] = xCo;
 triarray[1] = yCo-W;
 triarray[2] = xCo+W;
 triarray[3] = yCo+W;
 triarray[4] = xCo-W;
 triarray[5] = yCo+W;
*/ }
 void set(int x,int y,int fc,int lc)
 {
 shape::set(x,y,lc,fc);
 }
 void draw()
 {
 int triarray[] = { xCo, yCo-W, xCo+W, yCo+W, xCo-W, yCo+W};
 shape::draw();
 fillpoly(3,triarray);
 }
 };

 class noshape:virtual public shape
 {//int border[];
 public:
 noshape()
 {/*border[0] = xCo-W-MAR;
 border[1] = yCo-W-MAR;
 border[2]= xCo+W+MAR;
 border[3] = yCo-W-MAR;
 border[4] = xCo+W+MAR;
 border[5] = yCo+W+MAR;
 border[6] = xCo-W-MAR;
 border[7] = yCo+W+MAR;
 */}
 void erase()
 { int border[] = {xCo-W-MAR, yCo-W-MAR, xCo+W+MAR, yCo-W-MAR, xCo+W+MAR, yCo+W+MAR, xCo-W-MAR, yCo+W+MAR};
 setfillstyle(SOLID_FILL,DARKGRAY);
 fillpoly(4,border);
 }
 };
 class cherry:public noshape,public ball
 {
 public:
 cherry():ball()
 {}
 void set(int x,int y)
 {
 ball::set(x,y,WHITE,RED);
 noshape::set(x,y,WHITE,RED);
 }
 void draw()
 {

 erase();
 ball::draw();}
 };
 class Grape:public ball,public noshape
 {
 public:
 Grape():ball()
 {}
 void set(int x,int y)
 {
 ball::set(x,y,WHITE,BLUE);
 noshape::set(x,y,WHITE,BLUE);
 }
 void draw()
 {
 erase();ball::draw();}
 };
 class Square : public rect,public noshape
 {
 public:
 Square():rect()
 {}
 void set(int x,int y)
 {
 rect::set(x,y,WHITE,CYAN);
 noshape::set(x,y,WHITE,CYAN);
 }
 void draw()
 {erase();rect::draw();}
 };
 class Pyramid:public tria,public noshape
 {
 public:
 Pyramid():tria()
 {}
 void set(int x,int y)
 {
 tria::set(x,y,WHITE,GREEN);
 noshape::set(x,y,WHITE,GREEN);
 }
 void draw()
 {
 erase();tria::draw();}
 };
 class Wheel:  virtual public shape, public Pyramid, public Grape, public cherry, public Square
 {
 private:
 cherry ch;
 Grape gr;
 Square sq;
 Pyramid py;
 public:
 Wheel()
 {
 xCo=0;
 yCo=0;
 }
 void set(int x,int y)
 {
 shape::xCo=x;shape::yCo=y;
 ch.set(xCo,yCo);
 gr.set(xCo,yCo);
 sq.set(xCo,yCo);
 py.set(xCo,yCo);
 }
 void draw();
 };
 void Wheel::draw()
 {
 setcolor(WHITE);
 rectangle(xCo-W-MAR,yCo-W-MAR,xCo+W+MAR,yCo+W+MAR);
 switch(random(4))
 {
 case 0:ch.draw();break;
 case 1:gr.draw();break;
 case 2:sq.draw();break;
 case 3:py.draw();break;
 }
 }
 int main(void)
 {
 const int NUMBER=60;
 int driver,mode;
 driver=DETECT;
 initgraph(&driver,&mode,"c:\\TC\\BGI");
 randomize();
 Wheel w1;
 Wheel w2;
 Wheel w3;
 w1.set(100,100);
 w2.set(160,100);
 w3.set(220,100);
 for(int j=0;j<NUMBER;j++)
 {
w1.draw();
w2.draw();
w3.draw();
sound(100);delay(20);nosound();
delay(j*j/20);
}
sound(400);delay(400);
sound(500);delay(800);nosound();
getch();
closegraph();
return 0;
}

Note:- Run this program in Turbo C.

Experience While Doing This Program. 

Its was a very nice experience. I came to know about many graphics functions and use of classes and contructors.But it took lots of timebecause was using graphics in C++ for the first time. So I did n't know how to run the program of C++ including Graphic. By surfing on Net , I came to know about BGI folder contained in Turbo C. This Folder(BGI) contains all the graphics functions. So its path should be rightly given in Main() function.
 initgraph(&driver, &mode, "c:\\TC\\BGI") 
In this, Path is  "c:\\TC\\BGI" 

Second Problem That I faced is "Functions containing aggregate initializers are not expanded inline." It means that I used array in a member function of a class, then I put the values of each element of array altogether included in curly braces. The compiler gave a warning:
Functions containing aggregate initializers are not expanded inline
To remove this warning, I gave values to each element of array separately. Then It again gave me run time error, that was :- at run time, it was showing improper graphics. Triangle were not made proper. So again I switch to aggregate values. Compile it, its shows warning. Even then I ran the program using Alt+R then press enter. It started working.......:-)
((But still a confusion is there, i.e. how to remove that warning then. ))
Its yet to be discovered.....
Overall experience was very nice.


Wednesday, March 30, 2011

Installing Drupal In Ubuntu 10.04

Drupal is a an Open Source Content Management System. Installation of Drupal on Ubuntu 10.04 is relatively easy. Just follow the simple steps below:
1. Open a terminal and type:
sudo apt-get install drupal6
2. You’ll be prompted to select the database. With your arrow keys select mysql and press enter.
3. Enter your MySQL password when you are asked to. This creates a database schema called drupal6 in your MySQL RDBMS.
This is also supposed to auto-create the necessary files in the /var/www/ directory.
But it didn’t in my case, so I had to go for manual creation of files. Continue with the following steps only if you do not have a drupal directory in /var/www/.

4. Download the drupal6 source from http://ftp.drupal.org/files/projects/drupal-6.15.tar.gz. For Extract , do the following:
Open this downloaded Zip folder. Select all the files and folders in it. Right click on the  selection and choose Extract. A dialog box will be displayed. Create a new folder on the desktop and copy alll the files and folders in that folder.
5. Create the necessary directory in /var/www/ by th efollowing command in terminal:
sudo mkdir /var/www/drupal
6. Copy the contents of the extracted directory into /var/www/drupal/ by typing the following command in terminal:
sudo mv drupal-6.15/* drupal-6.15/.htaccess /var/www/drupal
In my case, this command was not working. For doing this, I changed the permission of root folder by the command:
gksudo nautilus
It displayed Root -File Browser Dialog box. Then I choose File System>var>www>Drupal
Then I copy All the extracted Files and folders contained in the folder placed on the desktop To folder Drupal(/var/www/drupal)
7. Create a directory files in drupal/sites/ by the following:

sudo mkdir /var/www/drupal/sites/default/files
 
8. Change the owner of the directory.

sudo chown www-data:www-data /var/www/drupal/sites/default
/files
 
9. Create the initial configuration files.

sudo cp /var/www/drupal/sites/default/default.settings.php
 /var/www/drupal/
sites/default/settings.php
 
11. Create a database drupal6 using phpMyAdmin.

mysqladmin -u root -p create drupal6
 
12. Log in to MySQL if you already have lamp-server installed on your system.

mysql -u root -p
 
13. Grant permissions to the root user (or the username you log into MySQL with) on all tables in drupal6 schema.

mysql>  GRANT SELECT, INSERT, UPDATE, DELETE, CREATE, DROP, 
INDEX, ALTER,  CREATE TEMPORARY TABLES, LOCK TABLES ON 
drupal6.* TO'username'@localhost IDENTIFIED BY 'password';
 
Here, ‘username’ is either root or any other username you use to log into MySQL and ‘password’ is the password of the username.
14. Open your browser and type http://localhost/drupal/. You’ll get the following page if you haven’t created a database for Drupal.

Database Configuration
Enter the details and click on Save and continue.
15. Next you’ll get a screen as follows.

Enter your email address under Site information. Under Administrator account, enter a username, email address and password. I used my phpMyAdmin username and password and my email address. Click Save and continue.
16. Then you get a page saying “Drupal installation complete”. Go to your new site.

Drupal Installed
Installation complete! Enjoy It…..

Saturday, March 26, 2011

Install LAMP on Ubuntu


To install it, type and run the following commands one by one in the terminal:
sudo apt-get install apache2
sudo apt-get installphp5 libapache2-mod-php5
sudo apt-get install mysql-server mysql-server
My SQL root password


You'll then be prompted to enter a MySQL application password for phpmyadmin. You can hit <Enter> and a random password will be generated. I chose to use the same password that I used for the root MySQL password.
My SQL Application Password
If you enter your own password, a password confirmation screen will come up. Confirm your password.
Confirmation Password


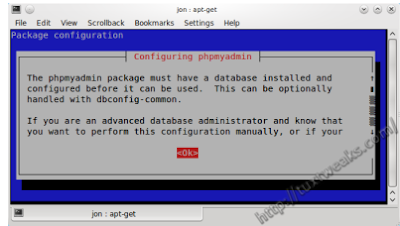
sudo apt-get install phpmyadmin
phpMyadmin setup
This is important! Use the space bar on your keyboard to select apache2. Make sure there's a * next to apache2 like the picture below and then hit <Enter>.  (Click the picture to enlarge it and see what I'm talking about.)
phpMyadmin setup:select apache2
The next screen will explain some information about database configuration. Hit the <Enter> key to move on.
phpMyadmin Database config
Another screen will come up asking if you want to configure a new database called dbconfig-common.  Since this is a fresh installation, use the <Tab> key to select Yes and hit <Enter>.
phpMyadmin dbconfig-common

sudo apt-get install libapache2-mod-auth-mysql php5-mysql
sudo /etc/init.d/apache2 restart
Note: We will be promoted to enter the password for mysql,phpmyadmin etc.It will look as if installation is going on with blue blink. But don’t get confuse. It is the space where you have to write the password. Press the Tab key to navigate from one button to another like to choose ok or cancel button, press the tab key for choosing it.

Monday, March 14, 2011

To convert an image into ASCII code

For doing this, install an image converter jp2a using command in terminal:
               sudo apt-get install jp2a
Now the command's syntax to convert an image into ASCII code is:
Syntax:  
jp2a [ options ] [ filename(s) | URL(s) ]
For example to convert the following image in ASCII:
 
Type the following commands:
cd Desktop
jp2a --size=40*20 easterlogo.jpg
Then press enter
Following image will be displayed in terminal:


 Have fun with other options too.....at the following URL:http://manpages.ubuntu.com/manpages/hardy/man1/jp2a.1.htm


Saturday, March 12, 2011

How to run songs in terminal of ubuntu?

Firstly, Install any music player e.g. VLC Player By typing command in terminal

sudo apt-get install vlc

Then give the following commands in terminal:

cd Desktop
vlc -I ncurses song_name.mp3


Note: Make sure that The song you want to play should be on desktop.

If Song is in any folder then syntax of command is:
vlc -I ncurses /home/user_name/music_folder


Tuesday, March 8, 2011

How to add a video to a webpage using HTML?

Syntax:  <iframe src =""></iframe>
For example:  to add a video to a webpage which is in You Tube, Give title u r using i.e. YouTube video player. Then give the source of video i.e. URL . Use embed to avoid whole web page of youtube showing that video which you want to add to your webpage. Lets see an example of a program showing how to add video......

<html>
<head>
<title>Tum Jo Aaye song</title>
<body>
<iframe title = "YouTube video player"height="390" width = "480"src = "http://www.youtube.com/embed/KfCdIr-E1Bs"frameborder="0" allowfullscreen></iframe>
</body>
</head>
</html>
See the source of URL. Actually  real URL ishttp://www.youtube.com/watch?v=KfCdIr-E1Bs&feature=player_embedded#at=231  . We used Embed to avoid whole Page .